The tees you own, both new and old, don’t need to look plain and boring. You can refashion them by cutting them up, resizing, painting them into a cute look that suits your personal style.
Here are techniques and step by step instructions for cutting over-sized tees, trimming tees to tank tops plus no-sew methods.
It is simple! All you need is creativity, cheap and readily available household tools such as garment scissors, a marker, measurement tool and learn-able skills as follows.
DIY T shirt Cutting Techniques
The techniques fall into about three broad categories;
- No Sew– This is the simplest cheapest method. In most cases, all you will require is garment scissors and some measurement tools. This technique does not involve stitching or sewing. . One prominent characteristic of this method is cutting and use of cut-outs.
- Sew/Stitching– This involves hand stitching or a sewing machine to make modifications to your t shirt. This is especially important when you want to combine two different materials or when you want to attach additional items (decorations) to your cut tee. Depending on the required final result, this method is may be costly and complex.
- Cut and Stitch. This is a combination of the two techniques above. It involves trimming and then stitching. The complexity will depend on what you want to achieve at the end.
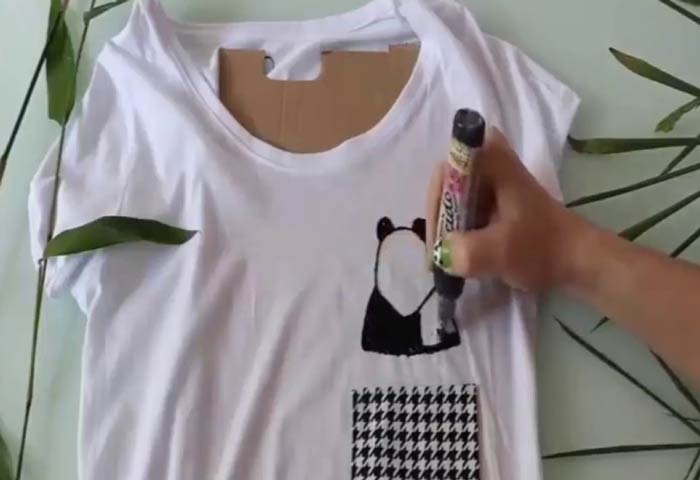
After using your preferred method of trimming you can also paint or print your cut shirt. This involves use of garment-friendly colors to paint your tees.
You may also require use of particular printing machines and skills to create a variety of art right on your cut tee. If you have a good number of tees, you may want to take it to another level: a Print on Demand Business(POD). POD is a rapidly growing industry worth investing in.
If your aim is just to have fun while putting you creativity into practice at home, below are basic tools you can easily get from Amazon.
How to cut an oversized t-shirt
There are quite a number of methods you can use to up-cycle an over-sized tee that may end up in the trash bin. To resize huge and baggy shirts, the easiest parts to cut off are the front, the back and the sides.
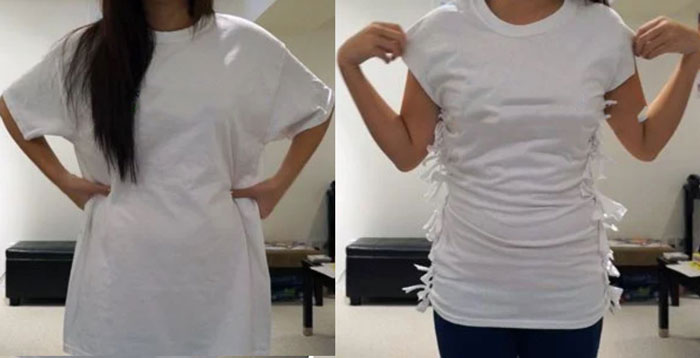
Method #1: Resizing from Sides
Your aim here is to create a well-fitting and may be add a little bit of styling. If you have stitching machines or any other sewing tools, you can stitch the cut sides but it is totally not necessary. You can create tie knots which will even make it more original and appealing.
Steps
- Find a flat surface and have your tools in place.
- The next step is cutting the collar but you may as well choose to leave it as it is. If you’ll want to cut it, the size will depend on your measurements or simply the style you want.
- Cut the bottom hem. Some may also choose not to cut it. It depends on your choice.
- The next step is to measure your waist to avoid too tight/loose fitting tee.
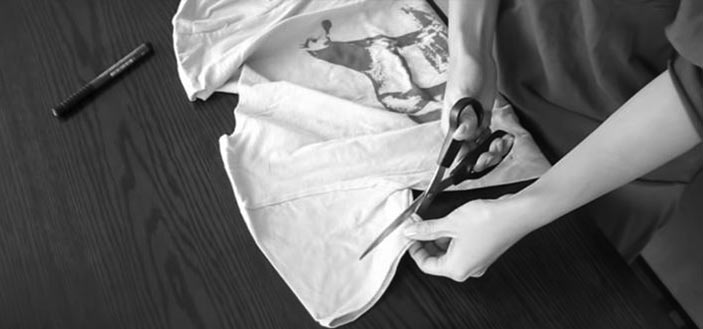
- Transfer the measurements to your shirt on the table or flat surface, cut the sides of the shirt from the bottom hem to the shoulder.
- Cut similar spaced slits on the sides from the armpit to the hem then tie the strands together. Finally, trim the raised fringes on the sides. Your shirt is now ready for use.
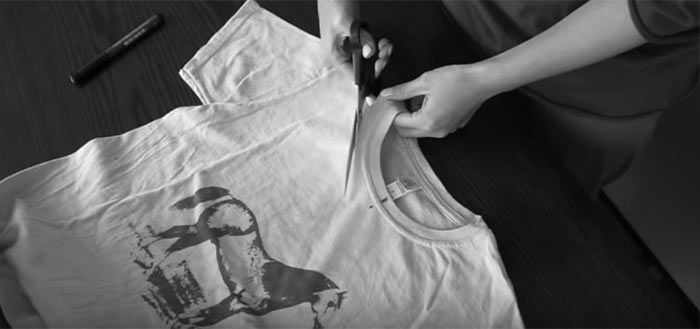
Method #2: Resizing from the back
Steps
- Lay the shirt on a flat surface then, using a pair of scissors, trim the collar along the stitching line from right to left.
- Keep aside the cut part. You will need it later.
- Depending on your gender, modify the collar. Most women prefer elongated front collar.
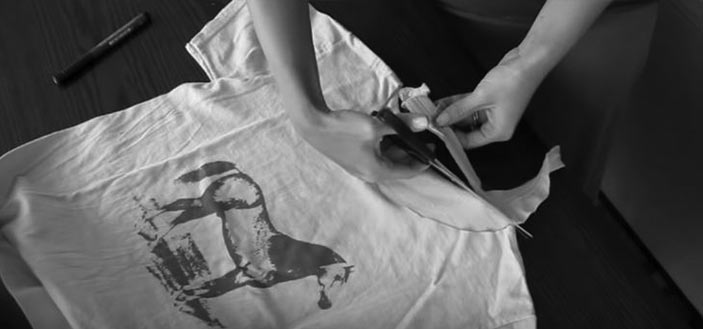
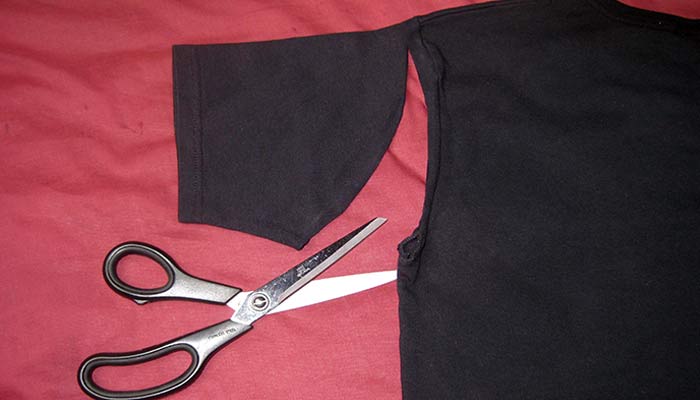
- Cut off the sleeves on both the right and left side to reduce the bulk of the fabric for the next step
- Using your fingers, enter through the armhole and bring together the trimmed sleeves.
- Use the cut off strip in step one to wrap tightly around the parts of the shirt that you’re holding together as shown in the photo below
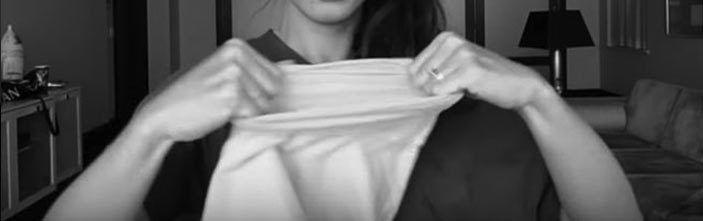
- Your new DIY tee is ready .
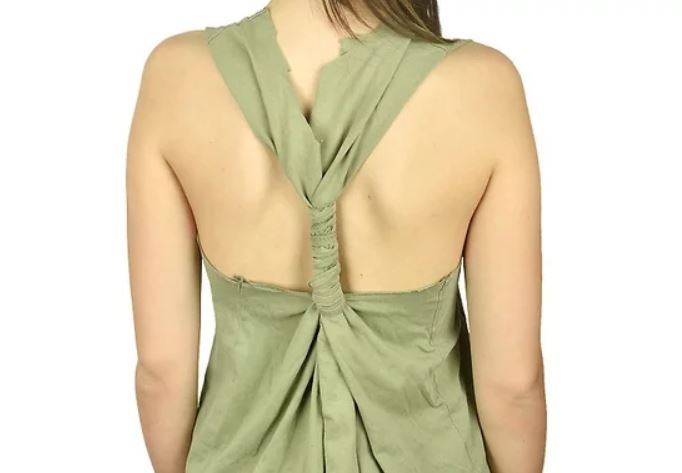
More Resizing ideas
Vback instructions
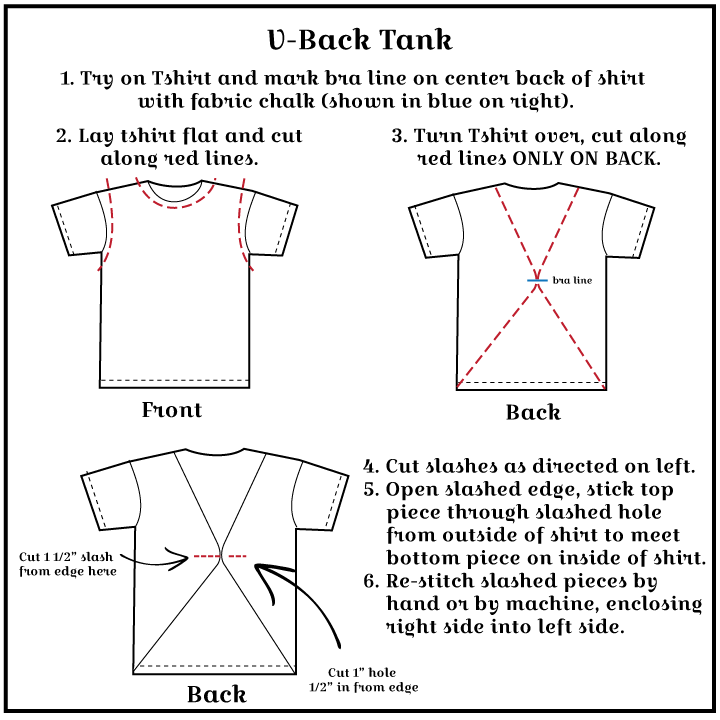
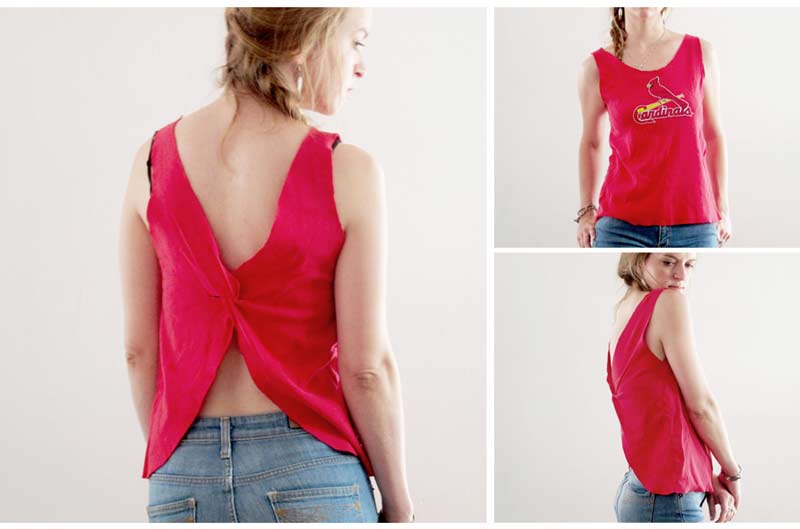
As mentioned earlier, you can also reconstruct you shirt from the front. Following are some ideas.
Below is another form of redesign from WobiSobi that looks perfectly awesome.

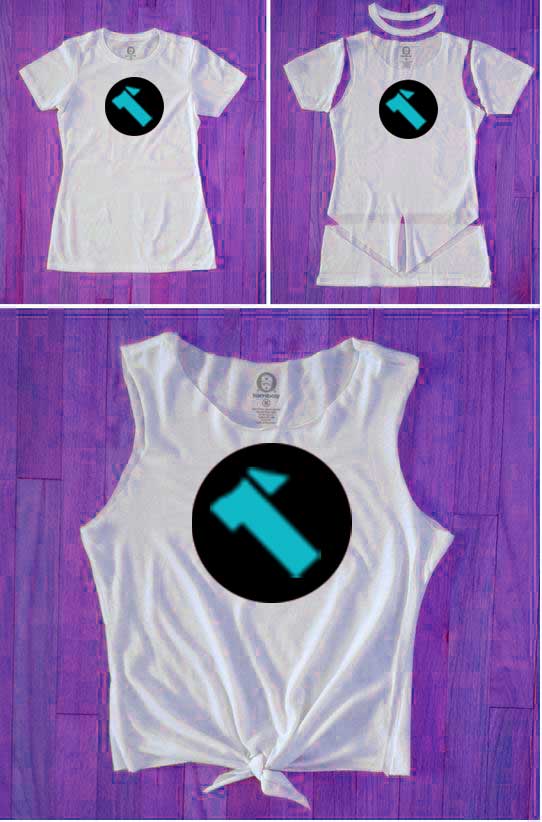
How to cut t-shirts into tank tops
All you need is a pair of scissors, a marker(optional) and a flat surface. The easiest way is just tear off the sleeves and boom… you’re ready to rock in your new self-made tank top. Here are the steps for a more accurate and clean look
Steps
- Measurements- If you are not sure of your accuracy, put on the shirt on flat surface and make guidelines using a marker.
- Using pair of scissors, remove the collar, cutting the front part lower than the back region. Making the front part is a matter of preference.
- Cut the bottom hem of the tee then keep the strip for later use.
- Cut off the sleeves of the tee not necessarily along the stitches part but depending on how you want the tank top to look like.
You can improve its appearance by cutting one of the side edges then make some holes on the fabric all along the cut hem. Use the strips from the cut bottom edge and lace it through the made holes. You can as well add some ribbons if you wish.
Video: Cut Tees into Tank Tops
Cut T-shirt Neckline off Shoulders
Generally, this involves modifying the neckline of a t shirt to a better, presentable and classy top.
You need a marker, tape measure and of course a t shirt. Below are the steps to follow.
Step 1
Fold the tee into two, front part of the garment facing out. Ensure the neck is lined up well in the middle.
Step 2
Mark where the fold is using a marker
Step 3
Take your tape measure your shoulder width from the base of your neck to the part slightly below your shoulder as shown below. Ensure to round it down by one or two centimeters to allow for stretching in a later step.

Step 4
Measure from the left shoulder to the mark you made in step two, as shown below

Step 5
Trim round the top layer from the shoulder, slightly away from the hem, to the marked part at the middle.
Step 6
Repeat step 4 and 5 for right shoulder. Remember to cut only the top layer
Step 7
After cutting the top layer, now cut bottom layer but ensure it is straight across from either the left or right should. This is to avoid an oversize neck in the finished tee.
Step8
Cut both the left and right sleeves off the hem. You can also cut the bottom of the off the hem especially if too large.
Step 9
This is the last step. Stretch out the trimmed parts of the tee. This gives your tee a messy fashionable and distressed look. Your tee is ready!
How to modify
You can add a little modifications by fixing a ribbon on the collar which maybe done through stitching or by use of glue.
You can as well add some cuts in a unique pattern of your choice at the back.
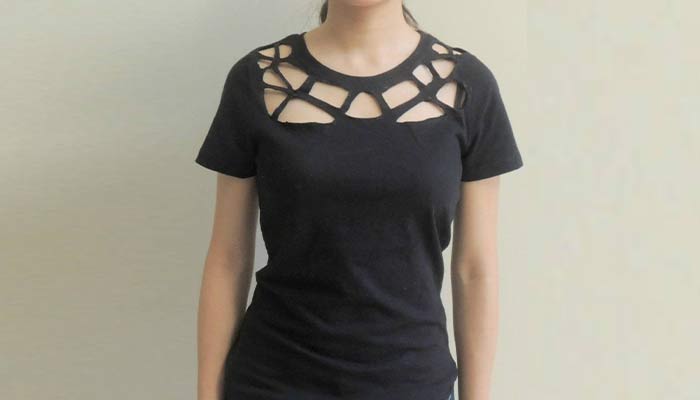
Another way of modifying your neckline is by making small cuts leaving very tiny fringes at the edges.
More Cool Cut up T shirt Ideas
In addition to what you’ve already learnt above, below are more ideas and techniques to trim your tee and make it cute.
DIY Choker T Shirt Cut-out
This is one of the easiest cut out out there. Instead of worrying about getting the best necklace or ornamental band, let your tshirt act as choker…it is all about being creative!

All you need is a tshirt that fits closely round your neck, scissors and a marker.
Draw v shape in the front layer using the marker then make a cut out and stretch it out. Finished!
You can leave it at that or cut-off the sleeves. You can as well make the cut from the back.
He is a video tutorial guide
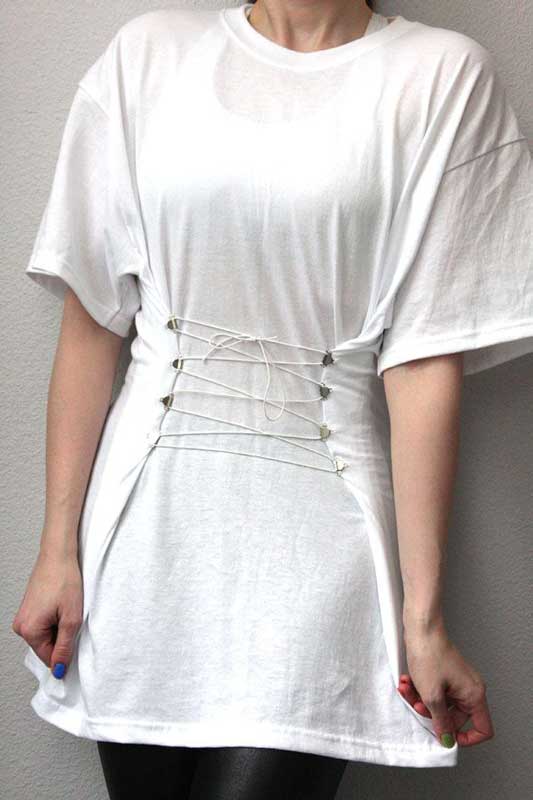
Grommet shouldered Top cut
In this type of cut, you require Dritz plier, eyelets, sewing tools and a pair of scissors.
Cut the seams of the tee’s shoulders and remove the neck.
Using a hem from old shirt, make a trim along the cut edges then fix the eyelets inside the fabric with the help of the pliers.
Use the sewing tools; stitch all-round the top along the collar making sure that the eyelets are kept in place then fix the laces in the eyelets.
Below are variations of this technique

Sleeve cut outs
This is yet another simple trim. You only require a pair of scissors or any tool that can cut garment.
Cut a slit on either side of the collar, get off the whole collar from the t shirt then pull the cloth at the shoulder’s seam. This will make the shirt curl at the top and will be ready for you to put on.
Additionally, if you need to improve the entire look of the tee, you can do this by further cutting semi-oval shapes at the bottom then removing the pieces. The edges of the cut part will act as your ties for clinching your tee.
Buttoned up tee
This is a technique that requires a sewing machine, though you can as well use a needle and thread. This technique works well with a v-shaped neck tees.
You will also need some buttons for the task.
Begin by removing the arms and the hem at the bottom to form a tee-tank. Cut the back of the cloth at the middle all through to the top the overlap it and stitch or sew to about 8 inches from the collar.
Finally, fix the buttons and trim the back part to have round edges.
You are now done and your tee is ready to be worn.
Moon cut
This will look pretty well on your tee. Make a shape of the moon(crescent) at the back of the shirt then using a pair of scissors cut it off.
From the inside of the tee, fix a lace with the shape of a moon at the open space left. You can opt to sew the lace or glue it on the fabric.
To make the top more catchy use a lace with different color from the tee. Although, you are encouraged to use a lace that will match with the tee’s color.

Twisted back tee
In this technique, you need a sewing machine and some pins. Start by cutting the neckline, arm and bottom hems then trimming the side ridge, through the arm and diagonally by the shoulder to the collar.
In an orderly manner, trim large triangles at both the top and bottom of the t shirt at the back side. At the point where the triangles meet, twist the fabric twice, pin the twisted region then sew it. Your top is now ready to be worn best with patterned leggings.
Shoulder Cut Out
This is a great technique though very tricky since you have to ensure that you make identical cuts. If it happens that you make a mistake, then the whole project will be ruined. Here, you only need a pair of scissors for the cutting.
Shoulder cut involves cutting the tee from either of the sleeves to the other, leaving gaps in between the cuts. Begin cutting from the sleeve, shoulder, the neck and finally on the other sleeve. Ensure you make similar cuts all through the entire tee.
Below are variations of should cut outs

Cut slits in the back of a t-shirt
If you need to make smart slit at the tee’s back, begin by making marks of the cuts you want to make then line up the side seams making sure that the drawn lines are also well aligned. Cut the slits following the marks you have made on the shirt.
You are encouraged to ensure that the slits are about 1 cm thick. This is done to prevent them from ripping off or overstretching and get thinner with time.
Making fringed fun cuts
Fringed fun cut is made by use of a pair of scissors to deal with a t shirt. You only need to first cut off the neckline, arms and bottom hems.
Thereafter, cut out the fringes at the bottom side of the shirt. The length of the fringes is not restricted; it is of your choice. You are advised to make thin fringes since they give the best look. However, you can choose any thickness that you wish to have.
Heart cut out
In this technique, you are required to have the skills of first cutting the tee into a crop top. This is done by removing the sleeves from the t shirt, ensuring both sides are identical. Cut off the bottom hem and the neck to make a well sized crop top.
After this, make the shape of the heart at the back of the crop top depending on the size of heart you need. Additionally, you can make a heart cut out by drawing the shape of the heart on either sides of the tee top then making oval cuts around the heart. This is a pretty idea to manifest your talent and can also be done on a plain t shirt.
Geometric cut out
This is one of the techniques that I loved most and you only need a pair of scissors. In this case, first cut the sleeves, neck and the bottom seam of the t shirt.
Then, fold the bottom part of the cloth at approximately two inches and cut triangle shapes from the folded part. Unfold the tee to disclose the diamond cut outs. For better a look, accompany the made top with a long necklace.
You can also simply do the cuts near the neck as shown below
Video Tutorials: YouTube
Modern Styles to Trim a Tee
25 DIY Cute Tee Trimming Ideas in 5 minutes
DIY Shirt Cutting
Most of the techniques above are only touching on tees and not shirts.
It is a fact there are plenty of old men’s shirts hanging around somewhere in your house and refashioning them into something like a dress or a skirt will be a great deal.
You can still trim and resize both short and long sleeve collar shirts using some of the methods you’ve already learned.
Do remember most shirts are made up different materials that are light and in most cases wont stretch.
Below are some the best video tutorials with tricks, ideas and instructions illustrating how you can creatively cut, modify or revamp your shirt
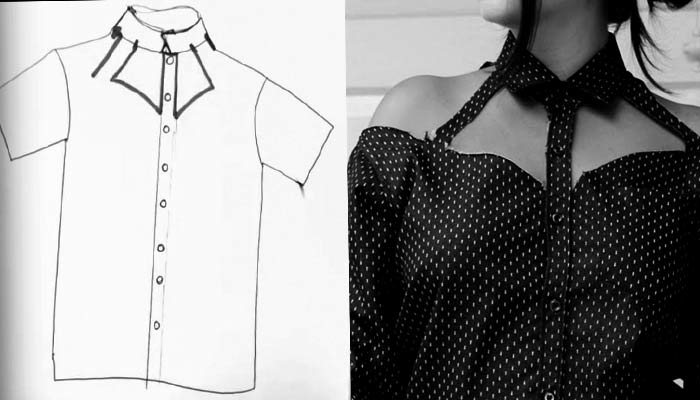
DIY Cut-Out Collar Cut instructions
Cutting shirts into bags
Why Cutting t-shirts is Good
You may wonder why someone wants their new shirts cut, but reality is, even new t shirts can be cut and made to some new and great items.
Generally, there are so many reasons you can decide to cut off your tees. This greatly depends on whether the t shirt is old or new.
You can decide to cut your tee so as to enable it fit you that is, be of a required size. Some persons will prefer putting on well-fitting tees while prefer them while still baggy. Therefore, it’s a matter of tastes and preferences.
Decorations. Old t-shirts can be used as decorations for your room especially on the walls. This is achieved by using well colored tees with certain patterns which you stick them on your walls. Though, this technique requires special art and creative skills for excellent outcome of the layout.
Climate/Season of the year. T-shirts can be cut to make it nice or better for use depending on the climatic conditions or weather season. You may decide to cut a long sleeved shirt to specifically make good use of it during summer time when it is very hot and you need vest like cloths to withstand the climatic conditions.
Cutting tees is another important method you can use to utilize the old clothes in your closet. This will help in conserving the environment for you will not dispose the old tees to the surrounding but instead you will make something of value out of them
Money saver- Cutting of tees can be done to minimize the use of expensive items in the kitchen such as mopes and knit dish towels.
This is achieved by cutting the t shirts into small pieces resembling kitchen cloths and using the tee as whole to mop the kitchen floor.
However, you can also cut it into small strands to make a latch hook rug which makes work easier as compared to when used as whole.
Improving looks– Sometimes, you will find individuals cutting the sleeves of their tees so as to improvise them and make their outfits look better and more presentable. This can be done by adding some laces at the edges from which the sleeves were cut.
Being Creative-In addition to this, t-shirts can be cut especially when they are a bit worn out to make jewelry such as necklaces and bracelets. You can can also create baby toys and pet toys out of old tees.


Hi, i think that i saw you visited my site so i came to “return the favor”.I
am trying to find things to enhance my website!I
suppose its ok to use a few of your ideas!!
Thanks for your marvelous posting! I seriously enjoyed reading
it, you are a great author. I will remember to bookmark your blog and
will often come back very soon. I want to encourage that you continue your great posts, have a nice holiday weekend!
Hey there! This is my first visit to your blog!
We are a team of volunteers and starting a new project in a community in the same niche.
Your blog provided us beneficial information to work on. You have done a wonderful job!
Thank you!